Thursday, 19 January 2012

Fiddly Sparks


Great Black and white shot from daughter Courtenay, ta.


Running Cabling through frame rail to hide, the tank will cover,


Cable exit for rear electrics, will be covered by number plate bracket . Rear indicator in place.


Right hand rear indicator


Very handy

Below me trying to look cleaver while Courtenay took some shots

Saturday, 14 January 2012

Youtube Summary


This is a short version with super cool new wave music from 1977

Cheers, Rob
3663

The Fiddly Bits


Indicator wires drilled into headlight nacelle and sealed will rubber gromits  


Rear guard bracket again with rubber gromits in the guard to reduce stress on the fibre glass


Bracket bolted to frame, still to be trimmed to shape


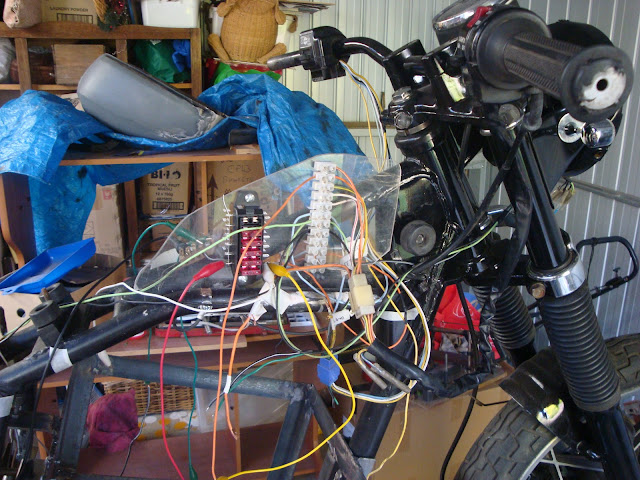
Oh yeh the birds nest, don't panic I'm picking up new wire for a new loom this Wednesday at the electric car club. 


For interest here is association bumper sticker giving the wed address. Check it out I believe they have been going for nearly 30 years


Lower bracket for guard. My wife tells me I don't include enough distance shots of the bike or enough information when I update. So next update, in about a 4 days will include more distant shots of the bike and for information, well I'm more of  a visual kind of person. 

Tuesday, 3 January 2012

Begin the wiring up


  Charge plug fits nicely into fuel cap using standard Plumbing fixings, The cap hinges and makes a nice air/weather tight seal. For interest sake the tank's from a 1972/3 Honda CB 350 


4 "idiot" lights mounted in tank, from top, Blue-High Beam, Orange-Indicator, Green-On, Red-Charging. I have a micro switch which will open circuit the ignition circuit while charging. 


Bottom tray which will be riveted on and sealed with a silicon sealer as this area needs to be water tight to house the controller.   


Ear rings! no LED indicators 


 Office coming together


Perspex mounting board for the beginning of wiring, I hope it's as easy as the leg bone connects to the hip bone!
I
Just showing the earthing common connector and earthing wires to the frame.

Wednesday, 21 December 2011

The Big Red Button

 Although I have a kill switch on the handle bar switch block I'm still having the big red kill button. The back cover plate has been cut from an old metal storage shelf , it also has the ignition on/off switch fuse and the 8g inertia switch mounted on the other side  

 Here is the rear view of the mounting plate showing the main isolator "Big Red Button" the 8 to 20g inertia switch, ignition switch and fuse holder. The "On" cct. has it's own 12 volt power supply operating the main contractor for the traction cct.


Basic cct diagram
 Rear of tank filled and sanded tread for primers


Thursday, 8 December 2011

Not much time but new stuff done


                                     Potbox, Hall effect and main contactor installed
                                                    Cable from original throttle
                                       Front disc calliper recon and installed
                          Headlight, original reinstalled, to damm dear for a new one
                           rear brake now cable operated with shortened clutch cable

                             Fuel tank bottom cut out for weather proofing electrical gear

                                 First application of fibre glass to Finnish off end

                                           Looking up into cutaway tank on bike
                       Speedo and custom bracket from GN250 1982 Suzuki, GN was the single cylinder